
Just yesterday, we got to see the Dragonzord hold its own weight in a realm of combiner robots. However, he, too, has a secret...
He's a combiner, as well!


Dragonzord, let's do it!


Concussive Dragon Strike!!


Next time: Empire Fusion!!

DRAGONZORD - FIGHTING MODE

Starting this mode, we need to put the Mastodon, Triceratops, and Sabertooth Tiger Dinozords into the same formations they take to form the Megazord. They'll serve the same purposes here, as well, but with a couple omissions.
The Mastodon shield will not join this mode, nor will the main cannons for the Megazord's various other modes. Those will stay with either the Tyrannosaurus or Pterodactyl.

After that, we'll begin the Dragonzord's transformation. Start by removing the tail from the backside. It pegs in similar to the Tyrannosaurus's knee ports, though surprisingly, it's plastic. Despite this, it seems tough, but always take caution, anyway.

Next, we'll split the waist. Just grab the legs, preferably at the thighs, and pull until the waist separates into two halves. The left hand side will be best to rotate away first.


For the most part, the brestler chest core seats the same way as the old DX version. However, there's an additional piece that hangs out of the bottom that secures it to the right half of the Dragonzord. Once you've rotated the left end, simply do the same with the right whilst making sure the core stays centered. Once freed from the body halves, it can be removed easily.

After that, we will fold the arms into the wings. You will need to change the hands back into the straight-fingered "perfect transformation" hands to fit. They fold up the same way as the DX ones, just make sure the hands are straight on the ball joint.

Also, I'll go ahead and note here. When it's time to put it back into its normal beast mode, since the hands recess so deep and have a tighter joint structure, there's an exposed track peg on the inside of the wing. simply push the peg up along the track to start the arm's redeployment. From there, you should be able to grab it with ease.


Now, we will swing the wings forward, meeting them front and center of the chest. There are snaps located in the black divots just below the arm cavities which will secure the two wings into the new chest plate.


For the legs, the knees need to be bent down a bit to properly get a finger under the thigh front covers. Lift those all the way up, and you can begin folding the calves up into the new opening. Once in, be sure to give them a forceful squeeze, as they'll hard-click once in their proper position. Remember, those black faux-knee joints will slide into the lower legs as they fold up, so no need to worry about those.
Lower the covers so that they rest atop the toes of the feet.

And finally, on the nodes the protrude from the back of the legs (now under), rotate the metal pegs downward until they're straight down from the Dragonzord. They can be difficult to start, and will likely pinch bare fingers and break nails trying to get that first click away from the calf. Caution is advised.

Dragonzord, let's do it!

Beginning the combination, the Mastodon will clip around the back. Unlike its formation with the Tyrannosaurus, there are no back slots on the Dragonzord, due to the cavity from the brestler. However, the two chunks at the bottom of the Mastodon slide into cutouts on the back of the Dragon, which help guide the rest of the combination.

After that, we'll secure the arms to the sides of the Dragonzord. Using the same pegs that hold it to the Tyrannosaurus's shoulder blocks, they will snap into slots just under the arm hinge of the Dragon's wings. (Sorry for the dark shot, I didn't have a mobile light to shine there...)

After the arms are secured, by on-screen transformation order, the face will be revealed next. Pull down the bottom jaw of the Dragonzord, and it should eventually tug the upper jaw out of place. Rotate that piece down to reveal the Fighting Mode's face.
One thing that's new is the visor needs to be slid down the properly form the face, as it sits higher to provide the Dragonzord's eyes when in its normal form.

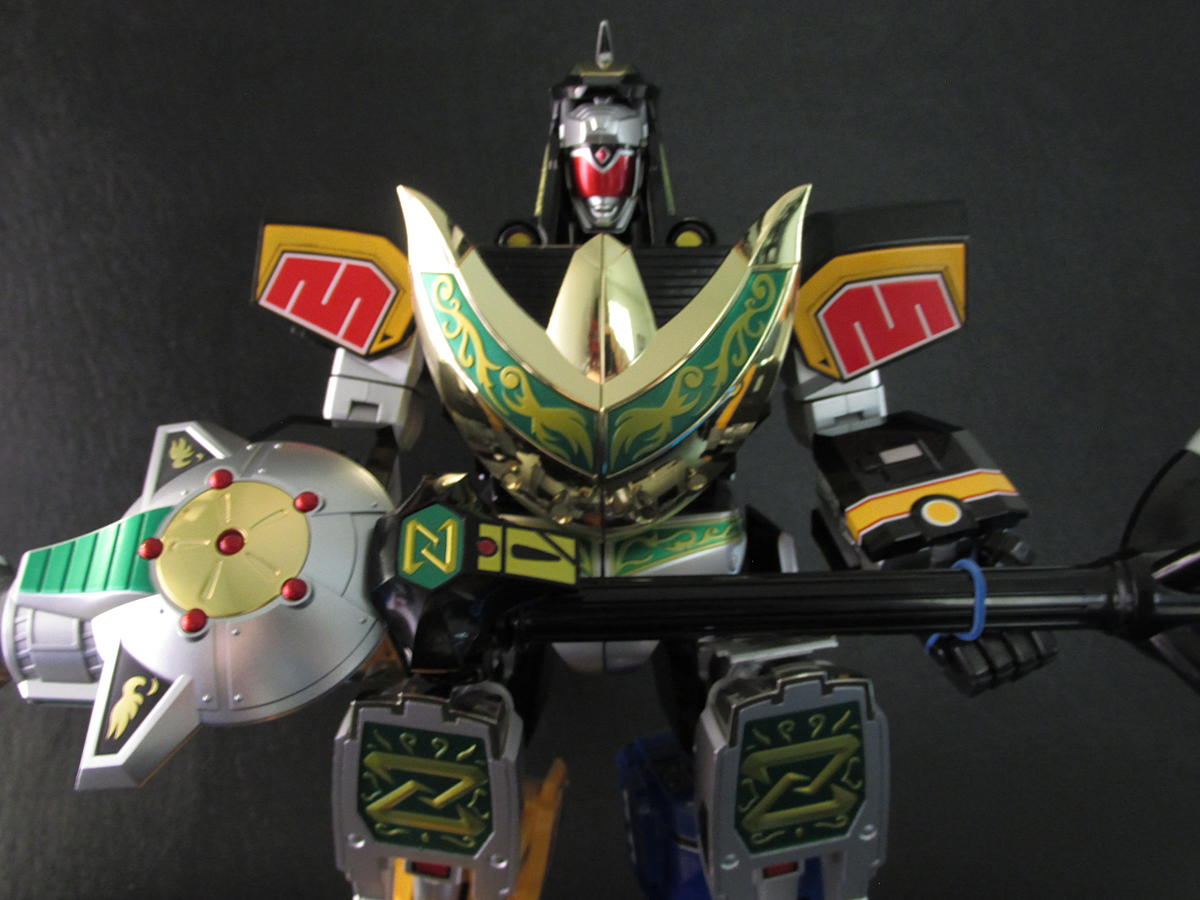
And to finish the formation, we use those ports on the bottom of the Dragonzord to peg into the Sabertooth Tiger and Triceratops, giving the Dragonzord some nice monster-stompin' boots.

Dragonzord - Fighting Mode is ready for battle!
I have to admit, this was always my favorite mode of the original
Zords. However it went oft unused, especially once Mega Dragonzord
became prominent. But also, that name.
In Japan, it's called
Goryujin, which roughly means "Mighty Dragon God." I think I would have
settled for "Mighty Dragonzord" or something along those lines. Saban
really didn't have a knack for naming things, back then, though. Hell,
even "Power Dragonzord" would have been okay, since everything had to be
"POWER" something.Anyway, rant over.


I think it's just neat to see all the red from the Tyrannosaurus and Pterodactyl being put aside for that marvelous green and gold provided by the Dragonzord. The big blocky "Z" kneecaps were also just something else!
It's just such a shame how limited this mode is in articulation. The hips have the same hindered spread as its original mode, and because of the front panels of the thighs, they can only go forward a minor degree. The knees are about the same as the Megazord, but lack that extra click from the Tyranno's pegs.
No waist swivel due to the splitting and hinged nature of the Dragonzords torso, but you do get the ab crunch that the Dragonzord uniquely has.
For what its worth, the Goryujin was listed as slower and less agile than the Daizyujin, but more of a powerhouse, so I guess these limits contribute to that weakness by design.
Next we go over the two weapons for this mode.
Wait, "two," you say?
Yes, but don't get excited. They're just two different ways to achieve the same weapon.
Power Staff (Perfect Transformation version)

To start this, we'll open up the front plate of the brestler, rotating it upwards.

From there, you'll see the feet to the stand part. Pull it out, whilst rotating it downward. After that, just straighten up the joints until it is fully formed.

Before we close the face plate, it'll be best to use your finger and feel for a rounded stick toward the back of the block interior. push it to open the lower circle, which reveals the handle. Just fold it out and snap the circle part back into its closed position, along with the main chest plate.

The staff base is now formed and ready!

Finally, we'll collapse all the tail joints down, straightening the tail into a solid spear.

Raise the plug on the top of the staff base and plug it into the tail's port. Be sure the actual slot is toward the back end of the staff.

And finally, the Power staff is formed!
This thing is just huge! I know it lacks the thickness of the Legacy Dragonzord's tail, but that drill tip is borderline ridiculous. I have a hard time getting the whole thing in the shot without leaving my photo booth.

To equip, just slide the handle into the Dragonzord FM's lowered hand. It should remain close to its natural resting level.

Dragonzord Fighting Mode wielding the fully formed Power Staff.
It's neat that this option exists, and impressive how they implemented it, but it sits so low and the centerpiece is way too large. It looks unweildly, and I had no confidence in putting it into any poses with this version.
So, with that, let's see what the TV version has to offer!
Power Staff (TV version)

No formation required for the main part of the staff. It's all one solid piece, with everything in much sleeker proportions.


It also sits higher, too, which is good for the handle positioning. However, when completed, it won't be topping the height of the transforming version.

With this version, only the last three segments plus the drill tip of the tail will be used. This is how it was separated in the box, so it already keys you into this ability to separate the tail parts. Just pull the joint away, and then place those segments atop the staff via a similar ball joint.

And that's it! TV version Power Staff is formed!
While the bottom feet of the stand are diecast, everything else about this one is much lighter, making posing the D-FM much easier.

Unlike most of the other Megazord weapons, you will have to open the hands completely, including rotating the thumb out of the way to get the grip in hand properly.

This size and positioning looks so much better in this formation.
Even still, the nature of the hands on the Mastodon make posing without
aid items unlikely. However, with some ingenuity, options do open
themselves.

Concussive Dragon Strike!!
You can probably see how I cheated the above pose here. lol

I'm always a sucker for lance-like weapons, which is why I love the Tallgeese from the Glory of the Losers manga so much. *swoons*
Comparison with the DX Dragonzord - Fighting Mode


First thing to note is HOW FRICKEN TALL the DX Goryujin is! It's a starker difference from the two different Megazords! And while, yes, the SoC D-FM (getting kinda sick of these acronyms, too) is quite limited in its articulation, it still holds a better stance than the large DX counterpart.

Also, its chest doesn't stick out so far from its head and arms, looking tougher and more lean, while still retaining an intimidating mass.

However, the two different Power Staffs both overpower the DX Power Drill (that's what it was called on its box...) in height, even though it wins in mass.
Also, I left the two leftover tail segments on the transforming staff base to kinda see where the height difference would be between it and the TV version, which is actually just shorter by almost a whole segment.
And with that, we close out the Powerful Dragonzord (Yeah, that's much better).

Oh? It looks like the Tyrannosaurus and the Pterodactyl have finally made it! I guess we know what that means....
Next time: Empire Fusion!!
Links to all parts
Part 1: Dragonzord - Beast Mode
Part 2: Dragonzord - Fighting Mode
Part 3: Mega Dragonzord (Finale)
No comments:
Post a Comment